Chocolate bunnies and egg hunts, what’s not to love? Easter is just a week away and whether you choose to celebrate the holiday or not, it provides the perfect excuse to make a colourful, buttercream filled, egg topped, sponge layered treat.
This cake was surprisingly easy to put together and makes a show stopping centre piece for any Easter festivities you might have planned. Oh, and it is gluten free of course.
INGREDIENTS
For the sponge:
- 250g / 10oz butter
- 300g / 10oz caster sugar
- 400g / 14oz gluten free self raising flour (I am using Doves Farm)
- 80g / 2oz ground almonds
- 2 teaspoons baking powder
- 6 eggs (medium)
- 2 teaspoons vanilla extract
- 2 tablespoons natural yoghurt
- Milk (optional / to adjust consistency)
For the icing:
- 500g icing sugar
- 500g butter (unsalted)
- 1 teaspoon vanilla
- Milk (to adjust consistency)
- Food colourings. I am using the Wilton ones: HERE
For the decoration:
- x2 bags of Cadburys mini eggs
METHOD
- Preheat the oven to 180C, Gas Mark 4. Grease and line three sandwich tins (if you only have 2, when you have used one – just use this one again). I use tins with pop out bases as it makes the sponge much easier to remove later on.
- With an electric whisk or stand mixer, beat together the butter and sugar for the sponge until light and fluffy.
- Gradually beat in the eggs and vanilla extract, a little at a time so the mixture doesn’t curdle.
- Add the flour, ground almonds, baking powder and natural yoghurt and beat until you have a smooth batter. To adjust the consistency, add more GF flour or milk until you get a smooth, but not runny batter.
- Distribute the batter evenly across the tins and bake in the centre of the oven for 15-20 minutes until turning golden (do it in batches if you cant fit them all in the oven, or don’t have 3 separate tins). To test the cakes are done stick a skewer through the sponge – if it comes out clean, the cakes are done.
- Turn them out onto a wire rack and leave to cool.
- Meanwhile, make the icing. With your electric whisk you want to beat the butter for about 5 minutes, it will start to turn lighter in colour. Then gradually sift in the icing sugar, followed the vanilla extract and a little milk – keep going with the icing sugar and milk until you have a smooth and firm yet still very spreadable consistency.
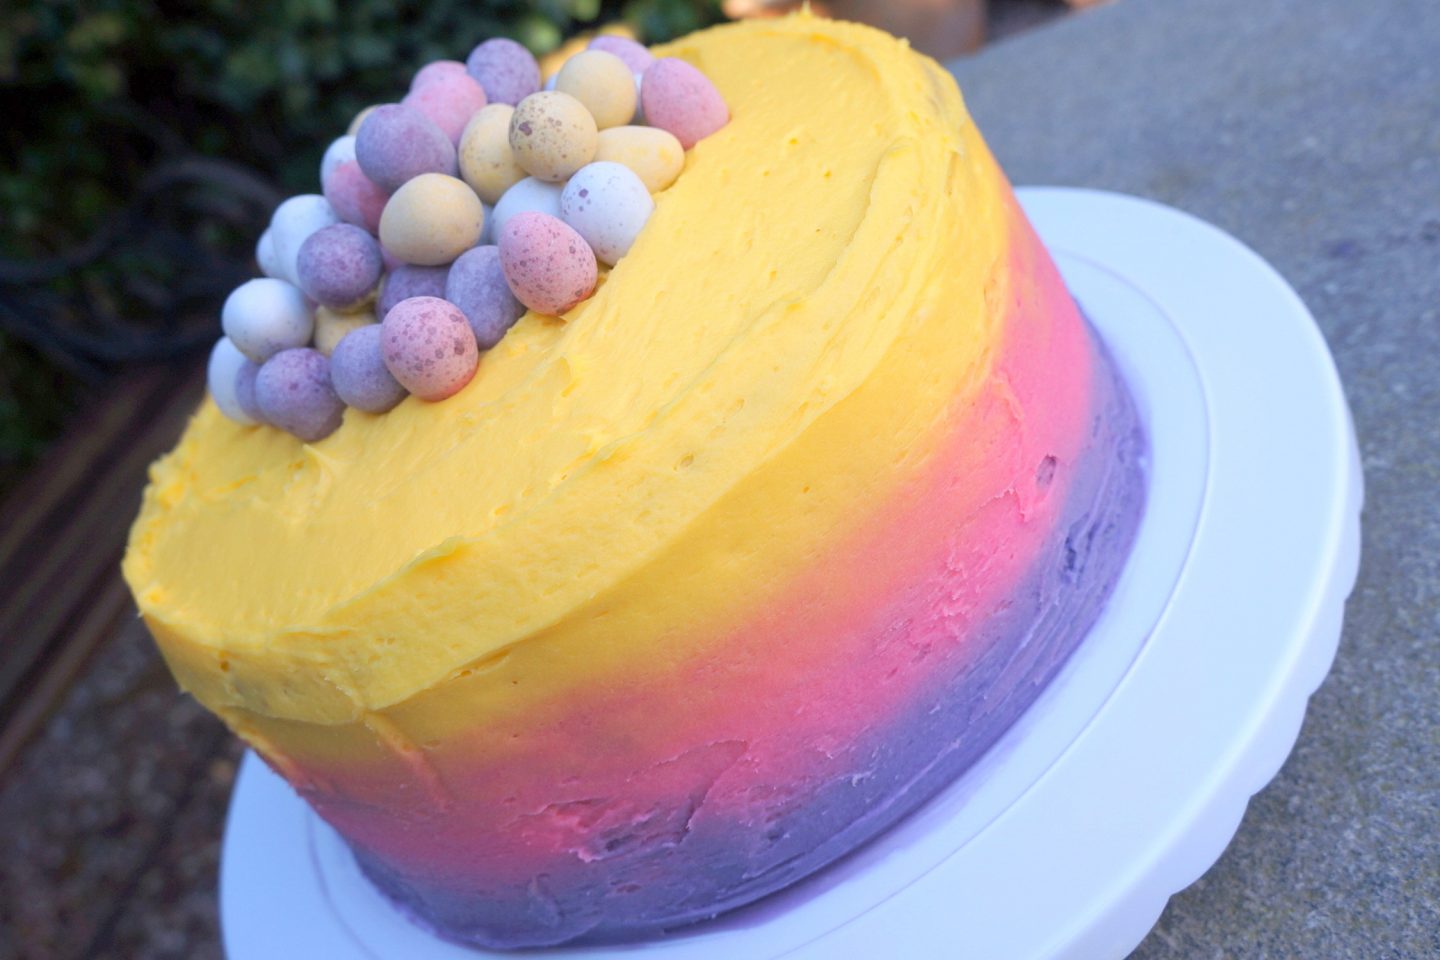
- Split the icing into 4 bowls. 1 bowl of buttercream you will leave plain. For the others, you will colour with purple, pink and yellow (or whichever colours you like!) by adding a couple of drops of food colouring to each. Mix until all combined.
- When the sponges are cool, stack on top of one another (ideally on a turnable if you have one) and sandwich together using the plain butter cream you put to one side.
- Next, split the 3 coloured icings into 3 separate piping bags. Pipe a layer of purple round the bottom tier, a layer of pink round the 2nd tier and a layer of yellow around the top tier and on the top of the cake.
- Taking a plastic icing smoother, spin the turntable and evenly smooth out the icing blending the colours into one another and discarding any excess. If you don’t have a turntable, just work your way around the cake.
- Smooth out the top and the sides until you get the desired effect. Decorate the top with mini eggs.
- Enjoy!
I hope you enjoy and have fun with this recipe. Last year I made gluten free ‘chick cupcakes’ see the recipe HERE.
Happy Easter everyone!
K
X
2 comments
These look soo cute!!
This looks incredible. It’s a shame I wouldn’t be able to eat. I’d have to find a dairy-free alternative, but it does look fab!
Mich x
https://michjosephblog.wordpress.com